


- Detalji
-
Kategorija: Uncategorised
-
Objavljeno 06 mart 2013
-
Pogodaka: 2837
The tempalte comes with great parameters.
Quickly change your Joomla website experience with just a few clicks. Change your layout, logo options, custom color and font choices.
Continue reading for examples of utilizing the template paramaters.
The template comes with template specific parameters. Below is a list of the different parameters and what each does. We suggest you play around with these to get an idea of what you'll need specifically for your Joomla website.
Step 1.
Login to the Administration Control Panel of your Joomla Template. From here navigate to Extentions >> Template Manager

Step 2.
Here you will see a list of the templates installed on your Joomla website. For our example click on the template.

Step 3.
On the right you will see a list of parameters for this specific template. We suggest you play around with these to find what works best for your website.

- Detalji
-
Kategorija: Uncategorised
-
Objavljeno 06 mart 2013
-
Pogodaka: 3366
VTEM features the exciting and very popular VTEMQuickStart custom Joomla! install option. With the VTEMQuickStart Joomla! installer, you can instantly create a Joomla! site complete with custom content that is a perfect replica of our demo sites that has been professionally tuned to look its best, all with just a few clicks. The VTEMQuickStart package consists of a full 2.5.x Joomla! install, complete with all of the demo images, content, modules, and extensions. By running the installer, your Joomla! site will be set up with all everything needed to create an exact implementation of the demo site automatically. The VTEMQuickStart packages are available for all template releases from 2010 to present.
This guide takes you through the necessary steps to install the VTEMQuickStart for Joomla! 2.5.
1) Download VTEMQuickStart
The initial step is to download the VTEM QuickStart itself. The packages are contained within the download section on the VTEM website where you find the templates and extensions. Each VTEMQuickStart pack is located within the corresponding template section, for example, the VT_Start_QuickStart pack is situated in the VT_Start Download Section.
Once in the appropriate section, select the download button for VTEMQuickStart. A pop-up will appear allowing you to save the package to your computer. It is best to download it to an applicable folder such as VTEMQuickStart or VTEM template for organizational purposes.
2) Extract the VTEM QuickStart package
Now that the VTEMQuickStart package is downloaded, we need to extract the archive locally. A range of tools can do this such as 7-Zip. The process is almost identical with all extractors.
1. Right click on the VTEMQuickStart package
2. Select one of the options for extraction - there are usually different options, but it is easiest to extract the archive to your desktop.
3. Select Extract
4. Wait for extraction to be completed
3) Uploading the extracted VTEM QuickStart package
We can proceed to the upload step. The idea behind this is to use an upload tool or FTP client such as Filezilla. For our demonstration, FireFTP, an extension for the browser Firefox is going to be our FTP client.
• Open the FTP client.
• Select Manager Accounts
• New
• Insert your ftp host address, usually, ftp.yoursite.com
• Enter your ftp username
• Enter your password
• Click Connect
• Locate the extracted packaged on your computer in the left pane
• Open the extracted folder and select the files inside
• Drag and drop the selected files into the right pane which is your web server
The speed of transfer varies with hosting server speed and your internet connection speed. It is best to upload the extracted folder to the public_html or in some servers it is called the httpdocs directory.
4) Creating The Database
While you are uploading the files to your server, it is time to create your MySQL database. The database is where your Joomla! files and images for your site are stored. You need to login to your hosting account cPanel to create your database. Normally you would use phpMyAdmin to create the database. Be sure to save your information from your database because you will need it when you install Joomla! Please contact your webhost if you need help creating your Joomla! database.
5) Installing the VTEMQuickStart
Once the Joomla! files have finished uploading, we can now run the Joomla! installer to install the VTEMQuickStart onto your web server.
5.1) Start the installer
Enter the following link into your web browser, changing the names to reflect your domain name and title of the uploaded VTEM QuickStart pack.
http://www.yoursite.com
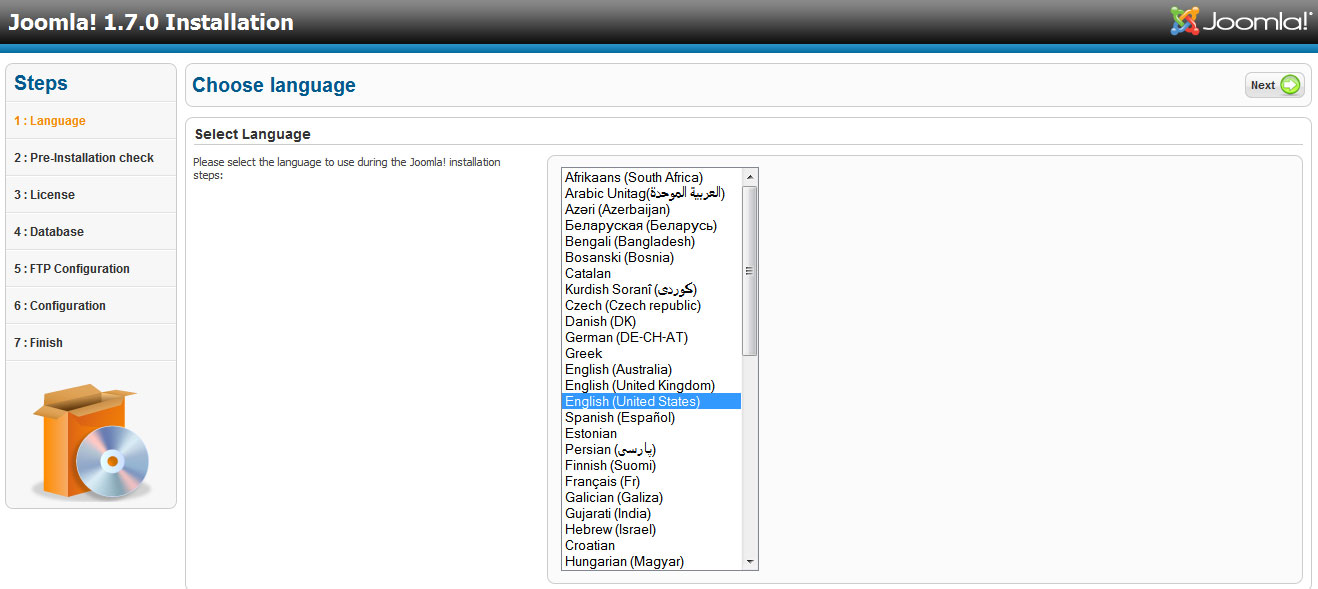
You will then be presented with the initial language page to VTEM QuickStart. Read through the documentation and select your default language from the list. Then choose the next button.
5.2) Pre-installation Check Page
The next step of the installer is the Pre-installation Check page. This is a check list of all the variables to make Joomla! work on your website. You must make sure that all variables are green.
For information on the error message, browse the Joomla! forums

5.3) License Page
The next page is about the license for Joomla. It is best to read to understanding the GNU GPL license for Joomla.
Once you are finished reading the terms of the license, choose Next

5.4) Database Info Page
The following page is where you enter your database information for MySQl. You will need to have your
• Host address, usually localhost
• MySQL username, which you can get from your hosting provider
• MySQL password, which you can get from your hosting provider
• Database name, which you can get from your hosting provider
• MySQL table prefix, if this is your first Joomla site, keep it the same but if you have multiple installs of Joomla, change this.
Once that is complete, select next.

5.5) Admin Settings Page
On this page, you can enter your ftp details, although it is not a required step.

Choose Next
5.6) Main Configuration
This is where you enter the title of your site, your admin e-mail and password. Write this information down so you do not forget it. Now, in order to get your new VTEMQuickStart to look like our demo site, you must click the Install Sample Data button!

Choose Next
5.7) Finished
Congratulations! Joomla! is now installed. The final step is to use your ftp client and remove the installation folder. Once you do that, you can begin editing your site.
- Detalji
-
Kategorija: Uncategorised
-
Objavljeno 06 mart 2013
-
Pogodaka: 3157
Joomla! offers three different types of messages. Creatings standard information about Joomla! system is presented depending on a message type as follows:
- Notice
- Error

- Detalji
-
Kategorija: Uncategorised
-
Objavljeno 06 mart 2013
-
Pogodaka: 3787
You've already been there... Joomla! is a great content management system. In fact it's considered one of the best in the world. But the default article system in Joomla! is so spartan! Just a title, your content body and that's it. This is where K2 comes in.
K2 was built as a complete replacement of the default article system in Joomla!. Install it like any Joomla! extension, import your articles from the default Joomla! article system and you instantly get a host of new features for your existing content:  rich content forms for items (think of Joomla! articles with additional fields for article images, videos, podcasts & other audio files, image galleries and attachments), hassle-free image management (uploaded item images are auto-resized to 6 configurable dimensions, either globally or per category - you can now forget about using Photoshop resizing!), comments, tagging, built-in options to extend content forms (e.g. to create product catalogs), powerful content modules fetching K2 content in any way you can imagine, frontend editing with easy to use access control settings (for content-heavy websites), powerful yet easy templating (and sub-templating) for going above the "Joomla! average", extended user profiles, user groups, blogs, a powerful plugin API to extend item/category/user forms, "drag and drop" media manager and many more!
K2 is the ideal solution for managing your content, regardless of site "size": you can use it from a small blog to a complex corporate site or even a multi-author environment (portals, runnings etc.). To provide a practical example, using K2, you can transform your Joomla! website to a news/running site with author blogs, product catalogs, work portfolio, knowledge base, download/document manager, directory listing, event listing and more, all this bundled under one package! And since K2 is extensible with additional fields to its base item form, you can easily create category-specific content types, e.g. article, blog post, product page, directory listing.
It's no wonder that K2 powers some of the biggest and most popular Joomla! sites ever built worldwide!
These integrated features in K2 not only save website administrators precious management time (from managing a dozen extensions which would otherwise be required), but they also allow for better performance.
K2 was actually built on these 4 principles: feature-rich content in Joomla!, ease of use (for any type of user), flexible templating, performance
And best of all? K2 is totally free to use!